Embroidery Tips
Following are some hand embroidery tips that are useful to know when working one of my designs or working on your own deigns.
Embroidery Frame – What Should I Use?
There are lots of options for frames that can be used for working embroideries in, below are some suggestions when working one of my designs.
Stretcher Bar Frame
Personally I like to use stretcher bar frames to work most of my designs in as they are light weight, easy to assemble and quick to put the fabric on and to keep the fabric tight in the frame.
Please see my Embroidery Frames Info page for lots of information on stretcher bar frames.
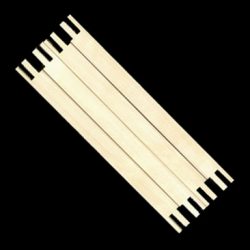
I stitch at a table with the corner of the stretcher bar weighted to the table so I have both hands free to stitch. I used to stitch on the couch or arm chair but I found I ended up getting back ache so the table was better for my posture. I also like to stitch at a table as I can keep my stitching supplies all around me.
As I photograph my embroidery every 10 minutes of stitching time I find it is a good frame for me to get up and down from the table easily without having to move anything and it is easy to get in and out of my stitching location.
If you do opt for the stretcher bar frame and want to work in a stand there are some good stands on the market that hold stretcher bar frames. When looking for a stand, look for one that is stable and does not wobble when you are stitching.
Hoop (Ring Frame)
I use a ring frame for small designs that are 2 – 3 inches in size. The largest hoop that I use is a 5 inch plastic or wooden hoop. This is for small designs such as my pendant and brooches, small blackwork butterfly and my iris and tulip shadow work embroideries.
I find that it is hard to keep the fabric tight in a hoop, even if the top and bottom rings of the hoop are bound with strips of fabric for grip. Also the hoop can leave a crease or dirty ring mark on the fabric that may not wash out.
I do not recommend washing any of my designs that are worked on silk fabric such as the modern Jacobean designs as the silk fabric can watermark.
The hoop can also permanently mark some fabrics that have a pile such as the the velveteen fabric of my goldwork designs and the ring mark might not be covered by the framing.
There are some large wooden hoops with 1 inch (2 1/2 cm) deep rings which are good to keep the fabric tight in the frame especially if the top and bottom rings are wrapped with fabric strips for grip but just be aware that the hoop could leave a ring mark on the fabric.
Slate Frame
If I am working on large projects or a project that I will be stitching on for a long time, I really like to work in a slate frame. I stitched the blackwork elephant in a slate frame as it would be hard to work the large design in a stretcher bar frame to reach the center of the design and it is easier to keep the fabric tight in the slate frame and more comfortable to work on as I work using a trestle system.
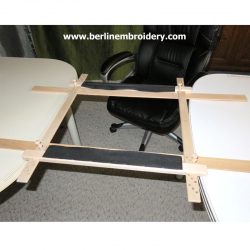
The slate frame is made up of two main bars/cross bars which have curtain tape stapled along the edge of the bar onto which you pin or sew the top and bottom of the fabric. The side arms slot into the holes on each end of the main bars and have holes drilled into them. These arms are pegged against the main bars so that the fabric is very tight. The sides of the fabric can also laced to the side bars. There is a good description on how to set up a slate frame and picture of a slate frame on BayRose website.
You do require trestles for a slate frame as the frames are often to heavy to balance on a table or on your lap. Trestles are like two frame stands that sit on either side of you and the sides of the slate frame sits on the trestles. Mary Corbet’s NeedleNThread forum has a picture of what trestles look like.
You can improvise a stand if you do not have trestles which is what I did when I stitched the elephant.
In the photo opposite you can see that I have two tables positioned apart. The sides of the frame can be balanced on the edges of the two tables and the stitcher work in the space in-between.
If you find the frame slips of the edges of the tables then you can get two wooden slats, lay these across the space between the two tables and then position the frame on the slats. This also gives you more room to work between the two tables.
The two tables are also very convenient to lay out your stitching stash and to postilion your light so you have a permanent work area.
Scroll Frame
These are large embroidery frames that are lighter than slate frames and are great if you have a floor or table stand so you can work with your hands free. This would be a good frame to work the blackwork elephant in as you can roll the embroidery in the frame to reach the center of the design.
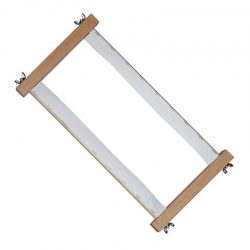
The two scroll bars have tape stapled along the edge on to which you pin or sew the fabric. The side bars slot into the holes on each end of the scroll bars and are screwed on so that the fabric is tight. The disadvantage to these frames is sometimes the screws become loose and therefore the fabric becomes loose.
It is a good idea to lace the sides of the fabric to the sides of the frame to get the fabric really tight in the frame. If you are rolling the fabric in the frame you could pad the embroidery when you roll it with a sheet and white towel to prevent creases in the fabric from the scroll bars.
The two scroll bars have tape stapled along the edge on to which you pin or sew the fabric. The side bars slot into the holes on each end of the scroll bars and are screwed on so that the fabric is tight.
The disadvantage to these frames is sometimes the screws become loose and therefore the fabric becomes loose.
It is a good idea to lace the sides of the fabric to the sides of the frame to get the fabric really tight in the frame. If you are rolling the fabric in the frame you could pad the embroidery when you roll it with a sheet and white towel to prevent creases in the fabric from the scroll bars.
Q Snap
The Q Snap is my least favourite frame as in my stitching and teaching experience I have found that the fabric easily slips in the Q snap so it is very hard to keep the fabric tight and the tension of the stitches even.
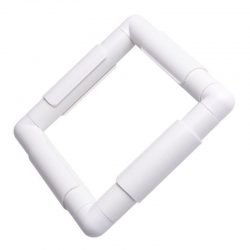
The Q snap has four plastic bars that slot together and the fabric is clipped into the plastic frame by slotting another piece of plastic over the fabric. To help avoid the fabric from slipping in the frame, the bottom frame can be wrapped in muslin/calico strips like bandages.
No Frame
There are only a few of my designs that I work in the hand which are the Hapsburg Lace (canvas work) designs as the canvas is firm enough to not require a frame. My tension is even, if you are a really tight stitcher then you could warp the canvas if you pull your stitches really tight.
I would not recommend working any of my other designs in the hand as it is hard to keep the stitches even and the fabric can pucker if the embroidery is not worked in a frame.
Transferring a Design onto the Fabric
Below are methods in which I transfer a design onto the fabric for my own designs and for the kits that I sell and methods in which you can transfer the design if you have to do this yourself. There are other methods of transferring designs but I find the following three methods are the ones I use excessively.
- My 2-sided Tropical Bird and Tropical Flower, Fine White Work kits, Goldwork kits, Mountmellick kit Needle Painting kits, Jacobean and Modern Jacobean kits all come with the design already transferred onto the fabric for you. I use the prick and pounce method or tracing the design with the aide of a light box.
- The art Blackwork designs and the Blackwork and Goldwork designs are transferred using the tissue paper transfer method which you will do yourself if you purchase one of my kits.
- The 2-Sided Apple Blossoms or Blossom Branch, Carrickmacross Lace and Shadow Work designs are transferred by tracing the design through the fabric. The fabrics are easy to see through and the designs fairly simple to trace so you will not need a light box.
The Hapsburg Lace and the Cross-Stitch Meets Blackwork and a few of my other blackwork designs are worked from a chart so you do not have to transfer the design onto the fabric.
Prick and Pounce Method
The prick and pounce method of transferring a design onto the fabric is the most accurate method for transferring a design and is great for detailed projects such as needle painting/thread painting.
I sell a complete prick and pounce set and the individual components on the website.
The design that you want to transfer onto the fabric is traced on to a piece of velum tracing paper using a pencil and drawing smooth even lines (heavy draftsman tracing paper not children’s tracing paper). If you have the design on your computer, the design can be printed onto velum tracing paper instead as this is quicker and more accurate.
The tracing paper is placed onto a folded up white tea towel and then you hand prick holes along all the design lines about 16th of an inch (2 mm) apart using a pricker which is a wooden or steel tool that you screw a No. 10 or No. 9 crewel embroidery needle into the end. The pricker is easier to use compared to holding the needle between your fingers and pricking the lines.
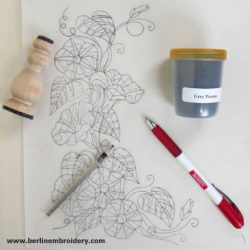
Once all the design lines have been pricked (hold the tracing up to a light source as it will be easier to see the missed lines) position the tracing paper onto the fabric for where you want the design to be. It is best to have a hard surface underneath the fabric so if the fabric is already in the frame you can position a book under the frame to add support.
You can weight the corners of the tracing paper to hold it in position which is easier than pinning the tracing paper to the fabric as it is more likely to shift when you lift it off. Rub pounce over the entire design, taking care not to rub the pounce over the edges of the tracing paper, use enough for even coverage.
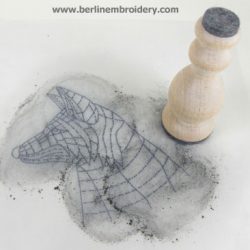
Carefully lift the tracing paper off the fabric. You should have a dotted outline of your design on the fabric in pounce. If some of the areas do not have pounce you can draw on what you can see then re-pounce the missing areas. It will be fairly easy to position the pricking back over the design once you have some of the design lines drawn in.
Draw over all the pounce lines using a pencil. Take care not to rub the pounce into the fabric with the palm of your hand. You can place a piece of paper on the fabric over the area that you hand rubs on, taking care not to shift the paper as you draw over the lines but carefully re-positioning the paper as you draw on the different areas.
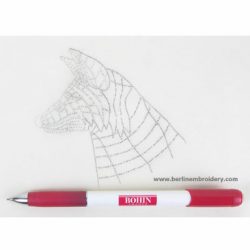
Blow off or knock of the excess pounce that remains on the fabric by holding the top of fabric so that it hangs down and wit the other hand wack the back of the fabric to knock of the pounce. If there is a few smudges of pounce on the fabric, this should wash out of you can try using a fabric eraser to erase the smudges, just be aware that on silk fabrics the eraser can leave a sheen on the fabric.
The prick and pounce method of transferring a design onto the fabric is the most accurate method for transferring a design because you can draw small details that are very hard to trace using a light box.
I sell a complete prick and pounce set and the individual components on the website.
Tissue Paper Transfer Method
The tissue paper transfer method is used to transfer designs onto the fabric when there are not outlines on the embroidery. This method is used for my art blackwork designs as the embroideries get their dimension from the shading of the patterns. Areas of the designs have no outlines so it is important that the tissue paper transfer method is used because drawn design lines would not get covered, spoiling the effect of the embroidery.
Trace the deign onto a piece of white craft tissue paper using a pencil.
Pin the tissue paper to the fabric in the desired position using dress making pins. Place the pins around the design so that the design lays flat on the fabric and is not puckered. Do not place the pins over the design lines as it will be hard to work the tacking stitches.
Choose a polyester sewing thread to work for your tacking stitches which should be a contrasting colour to the stitches that will be worked on your embroidery. For blackwork I use a red thread so I can see it easily.
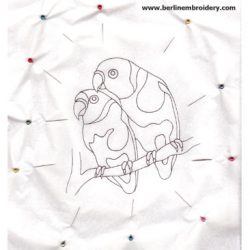
Tack all the lines on the tissue paper using a running/basting stitch but with a long stitch on the front of the work and a very short stitch, on the back of the work so that you have a continuous tacking line over the design lines on the tissue paper. When working on a flat surface on straight lines you can work two to four stitches at once.
It is better to work on a hard table surface rather than working the tacking in your lap or on a table with a table cloth as you can sew in your clothing or table cloth onto the back of the fabric by mistake when working the tacking stitches.
If you find it too hard to work the tacking stitches in the sewing method then you can put the fabric in the frame and work the stitches in an up and down motion, this can take a bit longer as you can only work one stitch at a time.
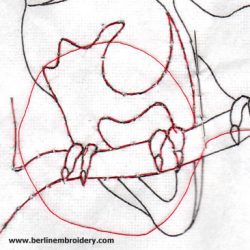
Once the tacking lines have been worked, rip the tissue paper away and you are left with a tacked outline of the design on the fabric. If some of the tacking stitches are loose and loopy, pull them tight at the back of the work.
I sell a very useful pair of fine tipped tweezers that can be used to pick out the small pieces of tissue paper that get caught between the tacking stitches. They are also useful for removing the tacking stitches and general embroidery such as taking out unwanted stitches and for goldwork and bead work.
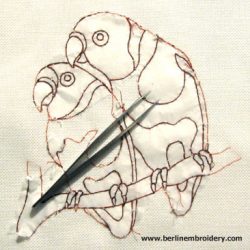
I love the tacking method of design transfer for my art Blackwork designs. Although there is a bit of work to get the design onto the fabric, once it is on, you can work the patterns with-in the tacked lines. If a mistake is made in a pattern you only need to take the stitches out in the tacked section and it does not mess up the whole embroidery.
Best of all is that the embroidery does not have to be outlined to cover design lines so a much more realistic effect can be created.
The tacking lines can be removed as you are working the embroidery or at the end once all the stitching has been worked.

Why Not Use An Erasable Pen: I do not use a air erasable or water erasable pen if the design lines are not going to be covered because some times the pen lines do not come out completely.
Tracing Method
I use the tracing method for some of my simpler designs where the fabric is easy to see through.
I use a pencil for tracing surface embroidery designs and a water erasable pen for the Fine White Work and Mountmellick designs.
Often I can trace the design without the aide of a light box if I have the design on a white surface and stitching lamp to help me see through the fabric. The designs that I trace are for techniques that have fine fabrics such as Carrickmacross Lace, Fine White Work and Shadow Work.
Occasionally I will use the light box for designs where the fabric is not as transparent and I do not want to make a pricking for because I have a time constraint.
There are now some excellent light boxes now known as tracing board available which are flat and that you can change the brightness of the background. The one that I have is by Hunion which I really like.
My embroidery kits use fine crewel embroidery needles or fine tapestry needles which can be hard to thread. If you don’t have a needle threader the following are some tips for more successfully threading a needle.
DMC Embroidery Cotton, Silk Thread and Perle Cotton Thread
To thread a single strand of DMC embroidery cotton or Au Ver a Soie Silk Thread or DMC Perle Cotton into a needle, cut the end of the thread so that it has a clean straight end and not a fluffy or shredded end.
Do not lick the thread as this can make the thread wet and dirty (transferring lip stick or gloss to the thread), if the thread gets wet or dirty so will the fabric. If the end of the thread is still a bit fluffy you can try rolling the end of the thread between your thumb and fore finger.
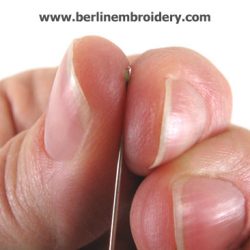
Hold the thread between your thumb and fore finger so that only the very end of the end is showing (much like seeing a splinter just protruding from the skin). With the other hand aligne the opening of the eye of the needle so that it is facing the thread and push the eye of the needle down onto the end of the thread (do not push the thread onto the eye of the needle as it will bend).
You can wiggle the needle slightly so that the end of the thread goes into the eye and then from the other side of the needle carefully pull the end of the thread though the eye of the needle.
Crewel Wool
Fold the end of the crewel thread over so that the thread is double and pinch the end of the thread between your thumb and forefinger so that it a sharp bend and then thread the needle in the same method as above.
Threading Tip
Some needles are easier to thread from one side of the needle than the other because of the way the hole of the needle has been stamped out in the manufacturing process. It is not obvious to see which side of the needle to thread the thread though as the needle can be very small. If you having troubles threading the needle from side try turning the needle over and threading the other side.
Keeping the Embroidery Clean
Clean Hands
The most important factor is always to have clean hands. If the embroidery does not get dirty then you will not have to wash it. Washing embroideries can take the luster out of the stitches.
Use a Covering
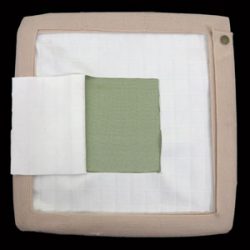
If I am using a stretcher bar frame I will wrap the outside of the frame covering the thumb tacks with a elasticated bandage which I pin at one end to the frame with a thumb tack to hold it in place which keeps the edge of the embroidery. I also put a piece of white sheet over the surface of the stitching and cut a window flap for the size of the embroidery.
You can also use a tissue paper or piece of clear plastic to cover the surface of the fabric. If you use tissue or plastic do not leave it on for a long period of time (months) as there could be acid in the tissue or plastic that could leach into the stitching and rot it.
No Food or Drink
I know it is obvious, but it is so tempting to have a cup of coffee or even water next to your embroidery for a quick sip. Unfortunately when a spill happens it can ruin not just the embroidery but your whole week. All the time and effort spent should not be wasted from one silly mistake. I now never have food or drink near by while doing my embroidery as getting food or drink on your work is not a mistake you want to make, I know!
Be safe rather than sorry. Keep all food and drink far away from your work and wash your hands whenever you have left your embroidery and come back to it. There may be greasy stains left on the last object you touched by happy fed children or husbands that can be transferred onto your work area.
Opps Blood
If you get blood on your work, immediately take a length of sewing thread (e.g. polyester thread), roll it into a ball and pop it in your mouth wetting it with your own saliva, it should be wet but not dripping.
Put a piece of kitchen towel or piece of white cloth under the embroidery to act as a blotter then rub the wet ball of thread over the blood spot, you may have to repeat this a couple of times. The enzymes in your saliva react with your own blood and dissolves it. This process needs to be done before the blood drys for it to be totally successful.
Occasionally a water mark may be left depending on the type of fabric you are working on. It is difficult to remove a water mark if one is left, even after washing the mark can remain, but more than likely you will be lucky enough not to have a water mark. A water mark is also less noticeable than a blood stain.
Cleaning Embroideries
I try to avoid washing my embroideries as washing the embroidery can take the luster out of the threads and I am not sure how washing will effect the fabric and threads.
I would not recommend washing goldwork as it could speed up the rate of tarnishing of the metal threads and the velveteen fabric could mark. I also wouldn’t wash embroideries worked on silk ground fabrics as silk fabric can water mark.
I would be okay to washing Mountmellick and needle painting designs but care should be taken when washing the designs.
The embroidery should be removed from the frame. Fill a basin with hand hot water and mild clear preferably unscented laundry liquid. Dilute it in the basin of water. Lay the embroidery flat in the basin was so that it is submerged. You can agitate the embroidery by moving it back and fourth in the basin but do not rub the stitching as you could damage the threads and do not scrunch the fabric as you could get crease marks in the fabric that won’t come out.
Let the embroidery soak and agitate where necessary. When the embroidery looks clean, remove the embroidery gently and rinse the embroidery clean of all soap. Lay the embroidery out flat on a clean white towel which will absorb some of the water and allow to dry.
If there are wrinkles in the embroidery when it has dried then place the embroidery onto a soft white clean towel with the front of the embroidery against the towel. Place a piece of tissue paper on the wrong side of the embroidery which is facing out. Choose the iron setting appropriate for the fabric and threads of the embroidery, if you are not sure set the iron on a low heat to start with and increase the heat gradually if necessary.
Gently iron the embroidery with the tissue paper between the iron and the embroidery. The tissue paper acts as extra protection in case the iron is to hot and burns the fabric or if there is a residue on the bottom of the iron that accidentally gets transferred onto the embroidery.
If wrinkles remain in the fabric, they will likely be removed when mounting the embroidery on a piece of acid free board ready to go into a frame.
I have instructions on mounting an embroidery on acid free board ready for framing.


